
Anyone who knows me knows that when it comes to the world of computers, the Atari 800 is my first and forever love. But the dawn of the 1980s also brought along a lot of other interesting machines. Over the years, I’ve been able to track down some of these, and add them to The Lab of Forever Tinkering (aka my house).
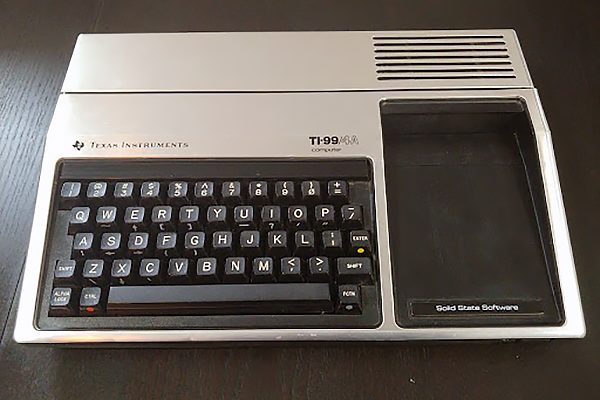
I’m excited to get to continue the experiments we started in the first article. Today, we’re moving on from the beloved Atari 800 to another classic from the era: the TI-99. Specifically, the TI-99/4a for those keeping score at home.
Can we get this 40-year-old machine onto the modern network? Place your bets. This is going to be fun.
Quick history: the TI-99/4
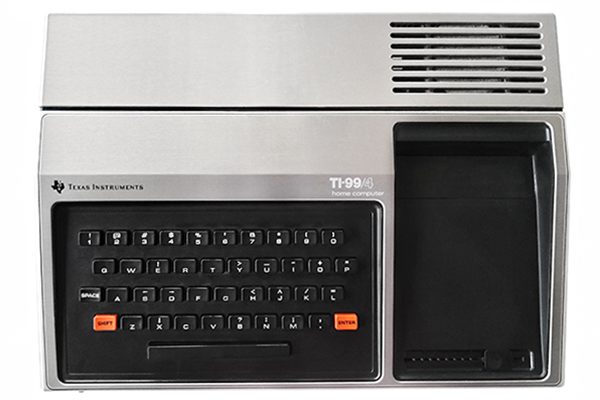
1979 was a good year for computer enthusiasts. The Texas Instruments TI-99/4 was released that year—the same year as the Atari 400 and Atari 800 computers. Powered by their in-house TMS9900 processor, it bears the distinction of being the first 16-bit home computer, a good nine years before the Sega Genesis (or Mega Drive depending on where you live) would be the next home consumer product with that kind of horsepower.
It was a nifty machine, but had several critical flaws:
- It had a non-standard, chiclet-style keyboard – very similar to a calculator (not terribly surprising coming from a calculator company), that people straight up hated typing on.
- Also, SHOUTING WAS MANDATORY ON THE TI-99/4, BECAUSE WHILE IT HAD A SHIFT KEY, IT DIDN’T ACTUALLY HAVE LOWERCASE LETTERS, SO IT WAS ONLY POSSIBLE TO TYPE IN ALL-CAPS.
- No expansion availability, and a meager 16KB of RAM.
- Practically no available software, “because of TI’s requirement for a ROM cartridge and only providing developer information to select third parties”.
- It was really expensive. The introductory price was $1,150 USD, about $4,345 in today’s dollars. For comparison, the Atari 400 was only $550 USD ($2,078). Even Atari’s flagship, the Atari 800, came in cheaper than the TI-99/4 at around $1,000 USD ($3,778), and the Atari 800 had three times the memory.
Ultimately, only 20,000 units were shipped before it was discontinued.
Let’s try this again: the TI-99/4a
The TI-99/4a was rolled out in 1981 to address the short-comings of the first-gen 99/4. It had the same CPU as its predecessor, but the graphics chip was updated to a TMS9918 (which is where the “a” in the TI-99/4a name comes from). It included a revamped keyboard, complete with lowercase letters and keys you might want to actually use. It was also substantially cheaper than the TI-99/4, starting with an introductory price of $525 USD ($1,584.30).
By 1983, that price had dropped to under $100 USD due to a price war with the Commodore VIC-20. All told, the TI-99/4a hit the mark the 99/4 had initially missed—selling more than 2.8 million units before the end of its run in 1984.
The TI-99/4a is what I own. It’s a handsome machine. I love the design of it: brushed metal with black plastic and nice sleek angles.

Testing gear run-down
Capture
This time around I’ll be capturing screenshots directly from the TI-99/4a using the Retrotink Mini. I have a Y-splitter from the composite video out of the TI-99/4a, with lead one running to the Retrotink, and the other out to my classic Commodore 1804 monitor.
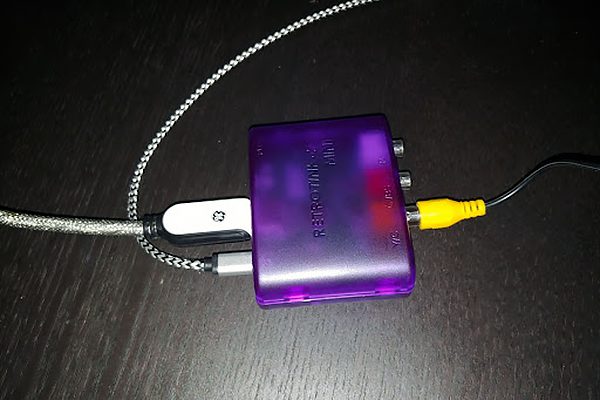
The Retrotink is running to an inexpensive HDMI capture card, allowing me to take screenshots.. The Retrotink Mini also works the other way: providing me the option of using a modern flat screen with the TI-99/4a and other classic gear.
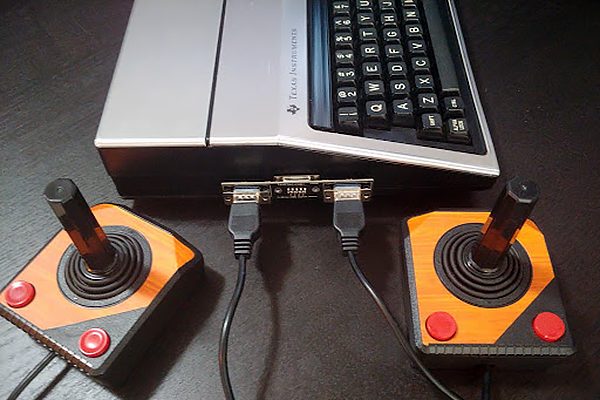
Joysticks
The original TI-made joysticks aren’t very responsive, and hard to come by these days. So, I use an adaptor for the joysticks on my machine.
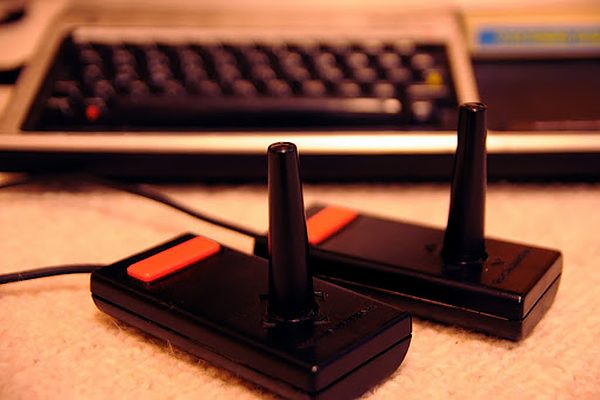
The adapter converts Atari joysticks (of which I have tons) to the TI-99/4a. I’m using two Hyperkin Trooper joysticks, which are actually brand new. They’re clearly inspired by the classic Atari CX-40 joysticks.
Expansion
One of the most interesting aspects of the TI-99/4a was the expansion system it used for adding peripherals. The right side of the unit has an edge connector that can be used to attach “sidecar” (like a motorcycle) peripherals.
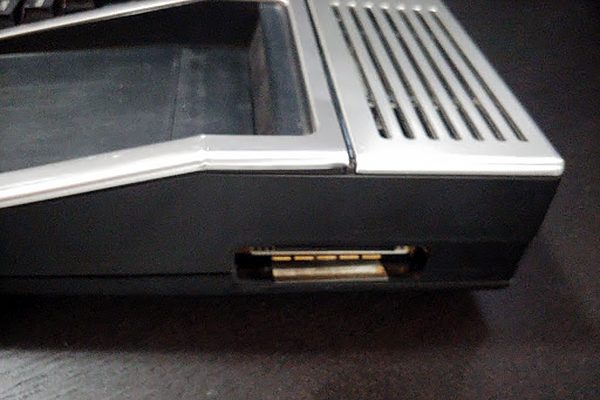
The peripherals themselves also have an edge connector, allowing you to daisy-chain multiple peripheral devices to the unit – all without any cables whatsoever. The only limit for adding peripheral devices was your imagination! Just kidding, it was literally the width of your desk.
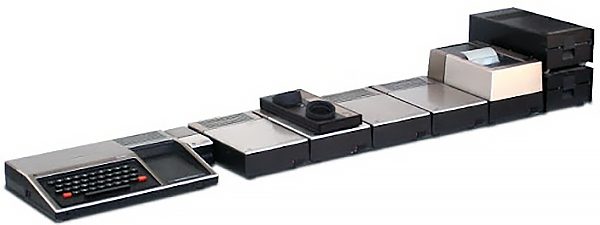
Personally, I think the setup in the picture above looks totally reasonable (editor’s note: personally, I do not), but some people felt it was somehow over the top. Many sidecar add-ons were available – a voice synthesis module, modems, printers, memory add-ons, and disk drives.
[Fun fact: Apple also experimented with this wide design. Check out the never-brough-to-market Workbench.]
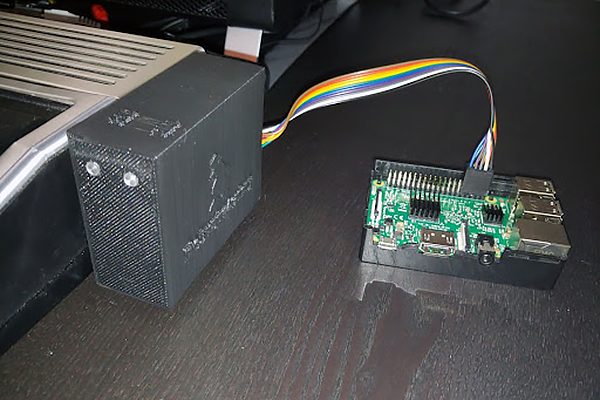
It’s this sidecar expansion that we’re going to leverage to get this TI-99/4a on the network. Specifically, we’re going to attach a Raspberry Pi to the TI-99/4a using the expansion bus to use the Pi as a slave device.
Test one: Will a TI-99/4a connect to a modern network?
We’ve collected the gear we’ll need (along with a few other modern devices), so it’s on to the first test! Let’s get started and see what happens.
The TIPI is our secret weapon here. The TIPI peripheral allows a Raspberry Pi to be used as both a storage device and a network interface for a TI computer (Get it? TI to PI?). First, I need to prepare the Raspberry Pi for its new role as a slave to the TI-99/4a. I connected the Pi via its GPIO pins to the TIPI with a ribbon cable.
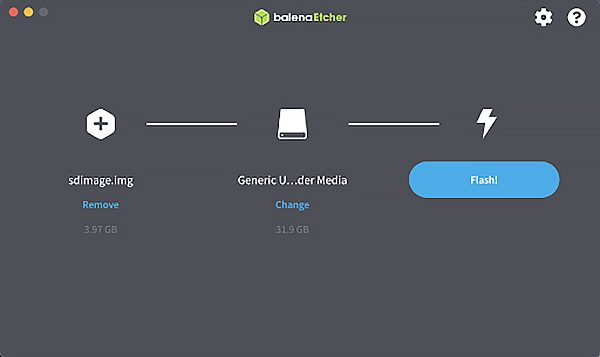
Next, I need to prepare a MicroSD card with the TIPI software for the Raspberry Pi (downloadable from here). You’ll need an application to write the software image to the Micro SD card. I like balenaEtcher for this task.
We’re all ready – time to boot the TI-99/4a. We’ll do this step-by-step so you can try it yourself at home (and if you do, let me know how it goes!).
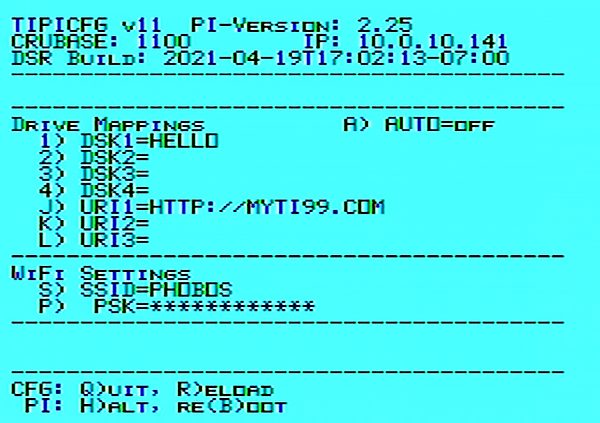
From TI BASIC we enter the following command to bring up the TIPI config menu:
CALL TIPI
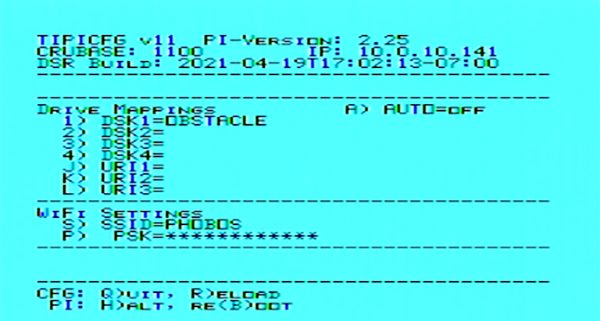
From here we can see the IP address of the Raspberry Pi. I can also configure the SSID and password if I want to use Wi-Fi instead of an Ethernet cable.
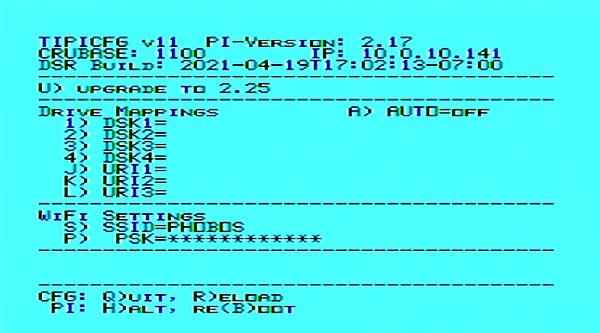
I can also shutdown the Pi remotely from the TIPI menu, or reboot it. The disk mapping options here are interesting, I’ll circle back to those later. For now, I want the configure the Raspberry Pi some more, using TI-99/4a to do it.
I can telnet to the TIPI from the TI-99/4a. From TI BASIC:
CALL TIPI("TIPI.NET.TELNET")
When prompted enter localhost for the host and 23 for the port. We’re now connected to the Pi. Default username is tipi and password is tipi.
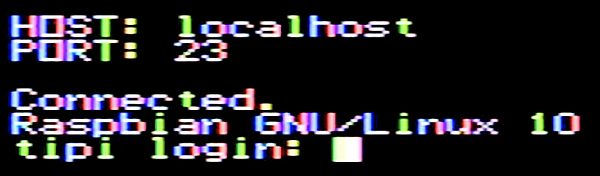
We’re now connected to the Pi’s bash prompt. Let’s start by changing the default password of tipi to something more personal.
passwd tipi
By default, the disk image we flashed to the MicroSD card above will only be using a small amount of the card. Since I can run any bash commands I want on the Raspberry Pi from here, I’ll run the following command to expand the storage to the full 32GB (may as well be infinite storage for a TI-99/4a).
sudo raspi-config --expand-rootfs
After a few minutes, it will complete expanding the storage to 32GB. You’ll need a quick reboot after.
Test two: Can the TI-99/4a connect to other network equipment?
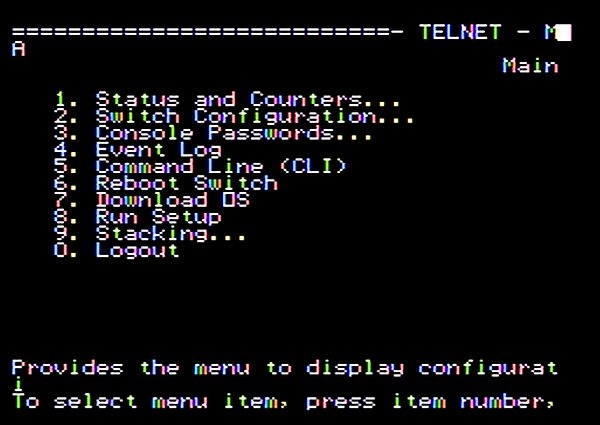
I can use the telnet client to connect to other equipment on my network as well. Like we did with the Atari 800, I’ll connect to my core switch (a HP Procuve 3500yl), once again using:
CALL TIPI("TIPI.NET.TELNET")
This time using one of the IP addresses of my core switch for the host, and the standard port 23 for telnet. Success!
Test three: Can we file share with the TI-99/4a?
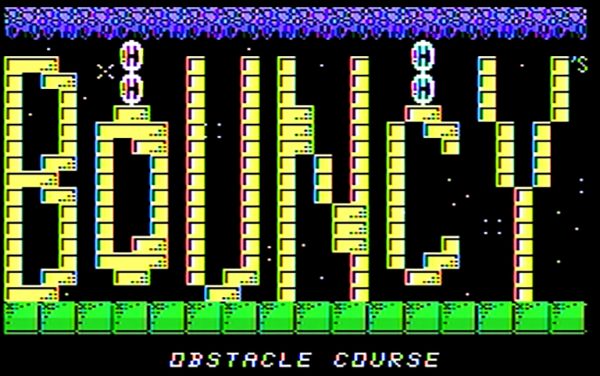
Now let’s try using the Raspberry Pi as storage for the TI-99/4a. The TIPI image on the Raspberry Pi automatically creates a Samba share, so I can easily access it using regular file sharing. The TIPI shows up on my network as TIPI. I’ll copy over a DSK image of Bouncy’s Obstacle Course, an excellent homebrew game written in 2019 by Rasmus Moustgaard.
With the disk image copied to the TIPI via file sharing, I need to mount the file on the TI-99/4a. For this task, it’s back to the TIPI config menu.
With the image now mounted I can reboot the TI-99/4a and Bouncy’s Obstacle Course will automatically boot…
Test four: Can the TI-99/4a use the internet?
All very cool so far. Now, let’s try loading software from the internet itself. First, I’m going to create a shortcut in the TIPI config for URI1 – basically this is just a shortcut to save some typing in BASIC. I’m going to be loading the TI-99/4a software from HTTP://MYTI99.COM, so I’m going to add that as a shortcut (using the editor trick below) in the TIPI config:
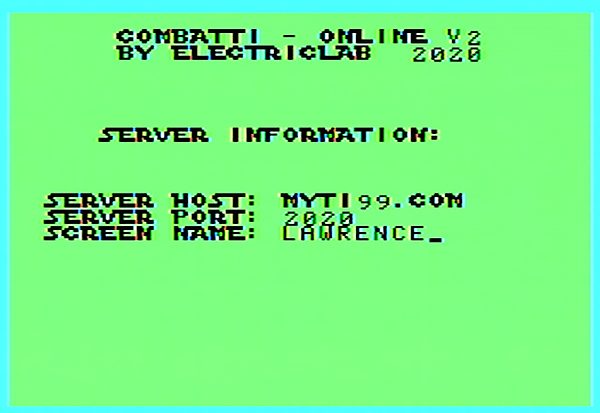
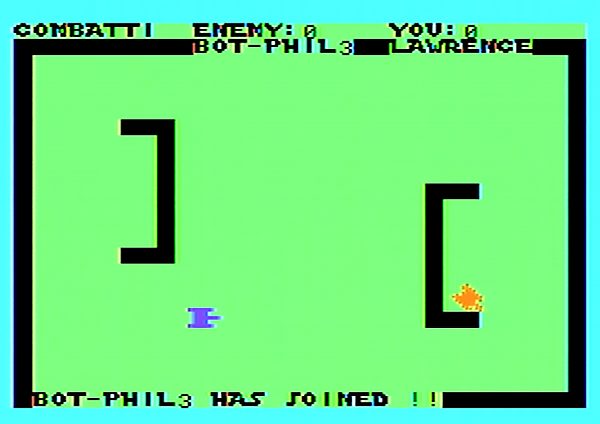
Now, with the URI1 shortcut made, I can use it for loading software from MYTI99.COM. First, let’s load a homebrew game called Combatti. I can load Combatti with the following command in BASIC:
CALL TIPI(“URI1.COMBATTI”)
Bonus test: web interface
Samba file sharing isn’t the only way to access files on the TIPI. It can also be accessed via a web interface on port 9900.
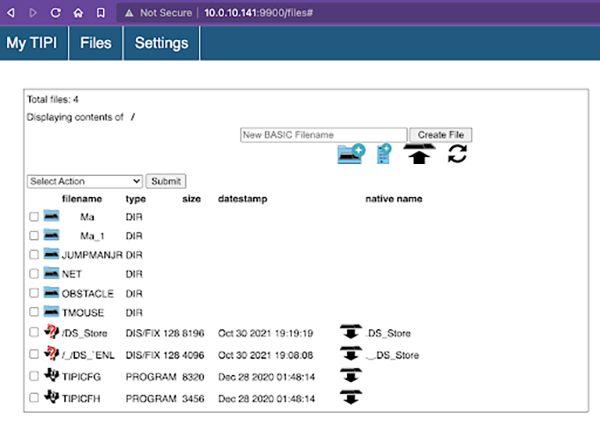
I can use the web interface to access the TIPI and copy files to it, which is really convenient. But there’s an even more interesting feature in the web interface that really blew me away: It has a built-in text editor for creating and editing BASIC programs.
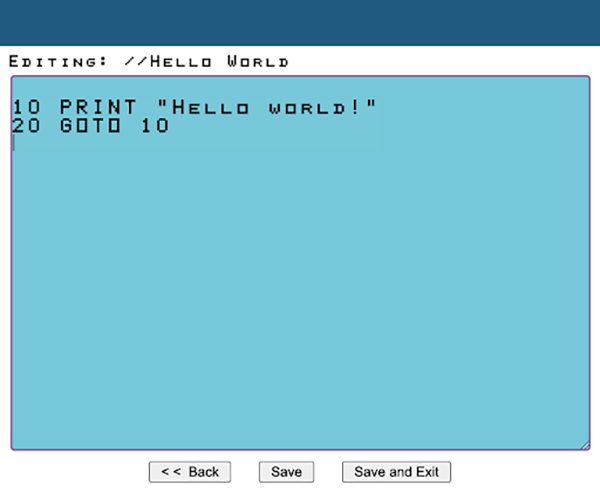
With my new program saved to the TIPI, I can load it from BASIC with the following command:
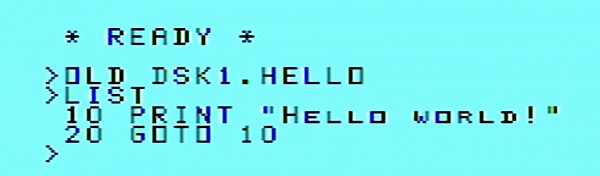
OLD DSK1.HELLO
The LIST command shows me that my simple Hello World program written in the web interface is now loaded on the TI-99/4a.
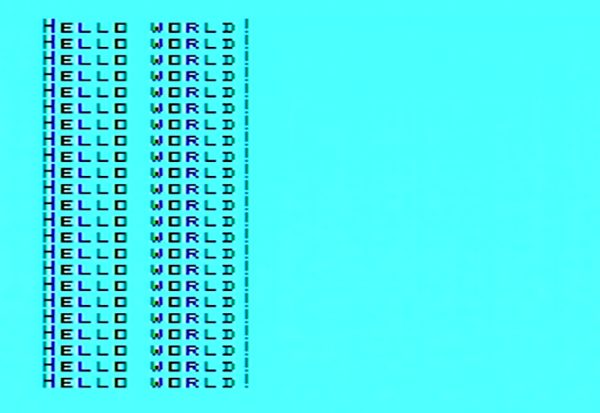
Another success!
What do you think? Ready to try it at home? Think a sidecar set up or peripherals the width of desk is smart and/or practical? Want us to try a favorite computer next? Let us know in the comments!
Get your free 14-day Auvik trial here.
Your guide to selling managed network services
Get templates for network assessment reports, presentations, pricing & more—designed just for MSPs.


I loved my TI-99/4a. I got one because the community college I was attending had a few that I had played with. We used to write simple games in Basic. One really great feature that set it apart from the competition was that it had 2 tone generators. My friends and I were able to use it to do phone call routing ala Captain Crunch. Only hacked the phone system twice, though. The first to see if it would work and the second time to help a friend make a long distance call during an emergency. We were young, poor, and long distance was pretty expensive in those days. This was in late 1983.
I remember with nostalgia programming a TI-99/4a at my school as an extra-curricular activity. My recollection is that we used a cassette tape player to save / load programs. Our most successful effort was a ‘lander’ program which simulated landing on the moon, and had rudimentary graphics made of ASCII characters. It was SO MUCH fun to play, especially once we got all the bugs worked out!
I still have mine and aven built my own expansion box
I worked at TI in their Lubbock, TX, production facility in 82-83. Very interesting seeing (and building) these from the ground up. Subsequently troubleshooting and testing, testing and troubleshooting. TI had many flaws in itself, let alone the TI-99/4A. When I worked there, the original price of the TI-99/4A was $99. This was in line with the naming convention. It was also a marketing scheme. They get you to buy the basic machine at a low price and then nail you if you wanted to buy any of the peripherals such as the TI Expansion System with which you could us a “32K x8 Memory Expansion” or an RS232 Interface (I have all this). So, IMO, one of the reasons this product went to its doom rather quickly is that no one wanted to purchase the extremely high-priced expansion products. Another reason that the plant in Lubbock eventually failed was for silly slip ups, for example: we had been waiting over a week for 1 chip to arrive. Without that chip, production would come to a halt. It did and TI told everyone to go home without pay. Subsequently they found the shipment of chips sitting in their parking lot in a semi-trailer that had been detached and parked and forgotten. Not long after, TI started laying off employees from this plant. Although the plant continued for some years after (I don’t remember how long) I believe that they were tasked with other product development (may have been some calculator production but I’m not sure). I could go on but I will stop with that.
As someone who wrote a fair amount of code for the TI-99/4A back in the day (including some VERY popular utilities) I enjoyed the heck out of this article. I’m also an Auvik customer these days. Small world!