
In early July, I had quite an adventure. The personal watercraft I was on broke down and started taking on water, so I bailed and swam to shore. The good news is that I made it, and the person I was with towed my watercraft to shore. But once we got there, we had to call for help. I had to use a borrowed cell phone, and it took me a couple of seconds before I remembered the phone number I needed to call for help! If you’re like me, you’re probably 100% reliant on the “Contacts” tab on your cell phone, and almost never remember anyone’s actual phone number.
The same can be said for nearly every interaction on the internet as well. The Domain Name System, or DNS, handles translating the names I input into a machine-recognizable number: their IP address.
If you’re reading this, you’re probably pretty tech-savvy, in that you could handle typing in IP addresses without much trouble. But for the average user, the internet as they know it would grind to a halt without DNS.
We are totally reliant on DNS, and while that can cause some security concerns, it can actually be used to our advantage through the use of what’s known as DNS filtering.
What is DNS filtering?
DNS filtering is the use of DNS to block or allow access to specific content through the use of DNS requests. While technically you can use DNS filtering to block any type of content, it’s most often used to block suspicious, malicious, and not-safe-for-work content.
How does DNS filtering work?
To fully understand how DNS filtering works, we can look at a few specific examples.
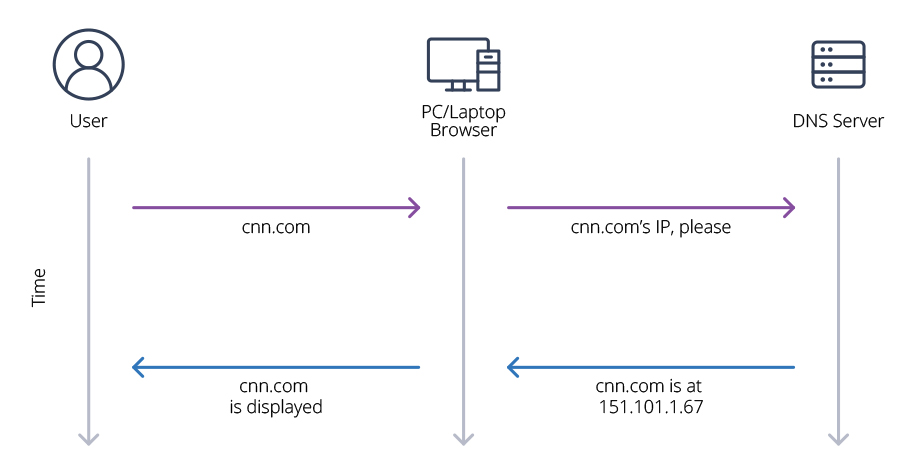
Let’s start with a connection that we want to happen, say a user wanting to access CNN. The very basic process looks like this:
- A user types cnn.com into their browser
- The browser sends a request to the DNS server to translate cnn.com into an IP address
- The DNS server responds by saying, “The IP address for cnn.com is 151.101.1.67” (Or at least that’s the IP address at the time of this writing)
- The user’s device then fetches content from 151.101.1.67
Now, what if the user is trying to access malicious content or blocked content? The basic process starts out the same:
- The user types bad-site.com into their browser
- The device sends a DNS request to the DNS server to translate bad-site.com into an IP address
- The DNS server receives the request and acknowledges that bad-site.com is on a blacklist, so it does not respond with the IP address for bad-site.com

What happens next depends on how the DNS filtering is implemented. First, the DNS server could respond with a sinkhole IP address: a non-routable IP address that the end device cannot reach. An example would be sending that sinkholed traffic to 169.254.0.1 or 127.0.0.1, both not routable IPs. Alternatively, you could send the traffic to a host you own and manage, designed to tell the user that the content was blocked, and why.
While these are user-initiated examples, the reality is that much of the time there are a lot of DNS requests happening behind the scenes that aren’t initiated by a user, and this is where DNS filtering really comes in handy.
Using DNS filtering to block threats
Security threats come in many shapes and forms— from low-effort script-kiddie-type attacks to sophisticated supply chain attacks. While no solution will prevent every attack, you can (and should) leverage DNS filtering as part of your security program. There are many “known bad” websites and IP addresses that appear on published blacklists that can easily be identified and filtered by a DNS server.
It’s not often a user navigates to a bad-reputation site in their browser on purpose. Most often, a compromised website or a phishing email with an embedded link tries to fetch data from the “known bad” site. By adding in DNS filtering, these threats are automatically protected against, with next to zero user impact.
Don’t forget to check your logs
Here’s where it’s important for you, as an IT admin, to monitor your DNS logs. Combing through the haystack for needles can be cumbersome, but having aggregate reporting on blocked threats can help you identify trends and see if your DNS filtering protection is kicking in more often than it has in the past. Or maybe it’s not kicking in quite as much, which could suggest you might be missing threats!
Using DNS filtering to block content
Working in a very similar way to threat blocking, you can use DNS filtering to block different types of content as well: advertising, pornography, hate sites, and other not-safe-for-work content. The process is pretty much the same— websites and IP addresses appear on a curated list of known ‘bad’ content.
In my experience, this works really well for ad blocking, but it can definitely fall short of other not-safe-for-work content. That’s because the blocking is based on the categorization of content, and content today is very dynamic. Take social media as an example. Everything from play-dates to pets, to profanity, can appear on social platforms. And blocking the entire social site is a “throwing the baby out with the bathwater” situation, as you’re blocking the “good” content the user is there for in an attempt to weed out the “bad” content you don’t want to be seen.
Consider using the flow, too
If you really need visibility into the types of traffic traversing your network, NetFlow with machine learning, such as Auvik TrafficInsights, might be a better option for traffic classification. Or, to get really granular visibility, you can do deep packet inspection (DPI) on all your traffic, including encrypted TLS traffic, and identify threats and not-safe-for-work content across all different categories of sites.
So while DNS filtering to block content is an option, I wouldn’t rely on it as your only method to filter out not-safe-for-work material.
How to get started with DNS filtering
There are plenty of options available in the market to help get you started with DNS filtering, both paid and open source. You don’t need to build a solution from scratch to start filtering your DNS queries.
At home, I use Pi-hole to block ads and protect against well known threats. In the corporate world, you’ll want to look at something that can scale more with your business, like Cisco Umbrella, Webroot DNS, and DNS Filter.
One tip: DNS filters are only helpful if your users actually use them! While many enterprise tools have an endpoint agent installed on your user’s devices, the open-source ones do not, and simply rely on your DHCP server to hand out the right DNS server IP address (or, rely on the correct manual configuration). If you’re not sure if all your users are using the correct DNS server, you can use Auvik TrafficInsights to identify all traffic on port 53 and see which destinations your DNS traffic is heading to.
Also keep in mind that the use of DNS over TLS (DoT) and DNS over HTTPS (DoH) are on the rise, so watch for improvements in both the open source and enterprise DNS filtering tools to accommodate this new reality.
It’s OK to have a love-hate relationship with DNS filtering, just like most of us do with DNS. While you want to avoid introducing DNS filtering as another point of failure for network users, it does add more complexity to your network and should become an additional step in troubleshooting network issues.
